Hey , to build this calculator you need to have a basic idea of python & tkinter GUI
Here is Your Code ::
import tkinter as tk
import tkinter.messagebox
from tkinter.constants import SUNKEN

window=tk.Tk()
window.title('Calculator')
frame=tk.Frame(padx=10)
frame.pack()
entry=tk.Entry(master=frame,relief=SUNKEN,borderwidth=3,width=40,bg='black',fg='white')
entry.grid(row=0,column=0,columnspan=4,ipady=2,pady=2)

def myclick(number):
    entry.insert(tk.END,number)

def equal():
    try:
        y=str(eval(entry.get()))
        entry.delete(0,tk.END)
        entry.insert(0,y)
    except:
        tkinter.messagebox.showinfo("Error","Syntax Error")

def clear():
    entry.delete(0,tk.END)

# buttons
button_clear=tk.Button(master=frame,text="CE",padx=15,pady=5,width=3,height=3,command=clear)
button_clear.grid(row=1,column=1,columnspan=1,pady=2)
button_clear=tk.Button(master=frame,text="C",padx=15,pady=5,width=3,height=3,command=clear)
button_clear.grid(row=1,column=2,columnspan=1,pady=2)
button_clear=tk.Button(master=frame,text="<",padx=15,pady=5,width=3,height=3,command=lambda:myclick("<"))
button_clear.grid(row=1,column=3,columnspan=1,pady=2)


button_1=tk.Button(master=frame,text='7',padx=15,pady=5,width=3,height=3,command=lambda:myclick(7))
button_1.grid(row=2,column=0,pady=2)

button_2=tk.Button(master=frame,text='8',padx=15,pady=5,width=3,height=3,command=lambda:myclick(8))
button_2.grid(row=2,column=1,pady=2)

button_3=tk.Button(master=frame,text='9',padx=15,pady=5,width=3,height=3,command=lambda:myclick(9))
button_3.grid(row=2,column=2,pady=2)


button_div=tk.Button(master=frame,text="/",padx=15,pady=5,width=3,height=3,command=lambda:myclick('/'))
button_div.grid(row=2,column=3,pady=2)

button_4=tk.Button(master=frame,text='4',padx=15,pady=5,width=3,height=3,command=lambda:myclick(4))
button_4.grid(row=3,column=0,pady=2)

button_5=tk.Button(master=frame,text='5',padx=15,pady=5,width=3,height=3,command=lambda:myclick(5))
button_5.grid(row=3,column=1,pady=2)

button_6=tk.Button(master=frame,text='6',padx=15,pady=5,width=3,height=3,command=lambda:myclick(6))
button_6.grid(row=3,column=2,pady=2)

button_multiply=tk.Button(master=frame,text="*",padx=15,pady=5,width=3,height=3,command=lambda:myclick('*'))
button_multiply.grid(row=3,column=3,pady=2)

button_7=tk.Button(master=frame,text='1',padx=15,pady=5,width=3,height=3,command=lambda:myclick(1))
button_7.grid(row=4,column=0,pady=2)

button_8=tk.Button(master=frame,text='2',padx=15,pady=5,width=3,height=3,command=lambda:myclick(2))
button_8.grid(row=4,column=1,pady=2)

button_9=tk.Button(master=frame,text='3',padx=15,pady=5,width=3,height=3,command=lambda:myclick(3))
button_9.grid(row=4,column=2,pady=2)

button_subtract=tk.Button(master=frame,text="-",padx=15,pady=5,width=3,height=3,command=lambda:myclick('-'))
button_subtract.grid(row=4,column=3,pady=2)

button_10=tk.Button(master=frame,text='.',padx=15,pady=5,width=3,height=3,command=lambda:myclick("."))
button_10.grid(row=5,column=0,pady=2)

button_11=tk.Button(master=frame,text='0',padx=15,pady=5,width=3,height=3,command=lambda:myclick(0))
button_11.grid(row=5,column=1,pady=2)

button_equal=tk.Button(master=frame,text="=",padx=15,pady=5,width=3,height=3,command=equal)
button_equal.grid(row=5,column=2,pady=2)

button_add=tk.Button(master=frame,text="+",padx=15,pady=5,width=3,height=3,command=lambda:myclick('+'))
button_add.grid(row=5,column=3,pady=2)


window.mainloop()
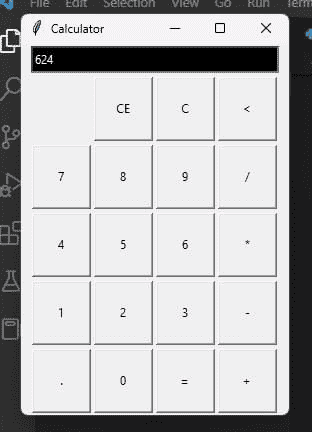
Output for the Above Code ::
Explaination ::
This code is a simple GUI calculator application created using the tkinter module in Python. The calculator has a basic GUI with a single input field (tk.Entry), where the user can enter their mathematical expressions, and a set of buttons that the user can click to input the numbers and mathematical operations.
The code starts by importing the required modules: tkinter and tkinter.messagebox. Then, it creates a main window using the Tk() method, sets the title of the window to 'Calculator', and creates a frame inside the window. The padx and pady parameters are used to set the padding around the frame.
Next, an Entry widget is created using the tk.Entry() method. It is assigned to the variable entry and is placed inside the frame using the grid() method. The widget has the following parameters:
- relief: sets the type of border to SUNKEN
- borderwidth: sets the width of the border to 3
- width: sets the width of the widget to 40 characters
- bg: sets the background color to black
- fg: sets the text color to white
- ipady: sets the internal padding of the widget in the y-direction
- pady: sets the external padding of the widget in the y-direction
After this, three functions are defined:
- myclick(number): This function is called when a button is clicked. It takes a number as input and inserts that number at the end of the current input in the entry widget.
- equal(): This function is called when the equal button is clicked. It evaluates the current input in the entry widget using the eval() function, converts the result to a string, and inserts it into the entry widget. If there is a syntax error in the input, it displays a message box with the error message.
- clear(): This function is called when the clear button is clicked. It deletes the contents of the entry widget.
Then, a set of buttons are created using the tk.Button() method. Each button is assigned to a variable and is placed in the grid using the grid() method. Each button has a text label, a command that is called when the button is clicked, and the width and height of the button are set to 3 characters.
The CE button clears the last input, the C button clears the entire input, and the < button deletes the last character from the input. The other buttons correspond to the numbers 0 to 9, the decimal point, and the mathematical operations +, -, *, and /. The equal button evaluates the input, and the result is displayed in the entry widget.
Finally, the main window is started using the mainloop() method, which keeps the window open until the user closes it.